Flutter 框架简介
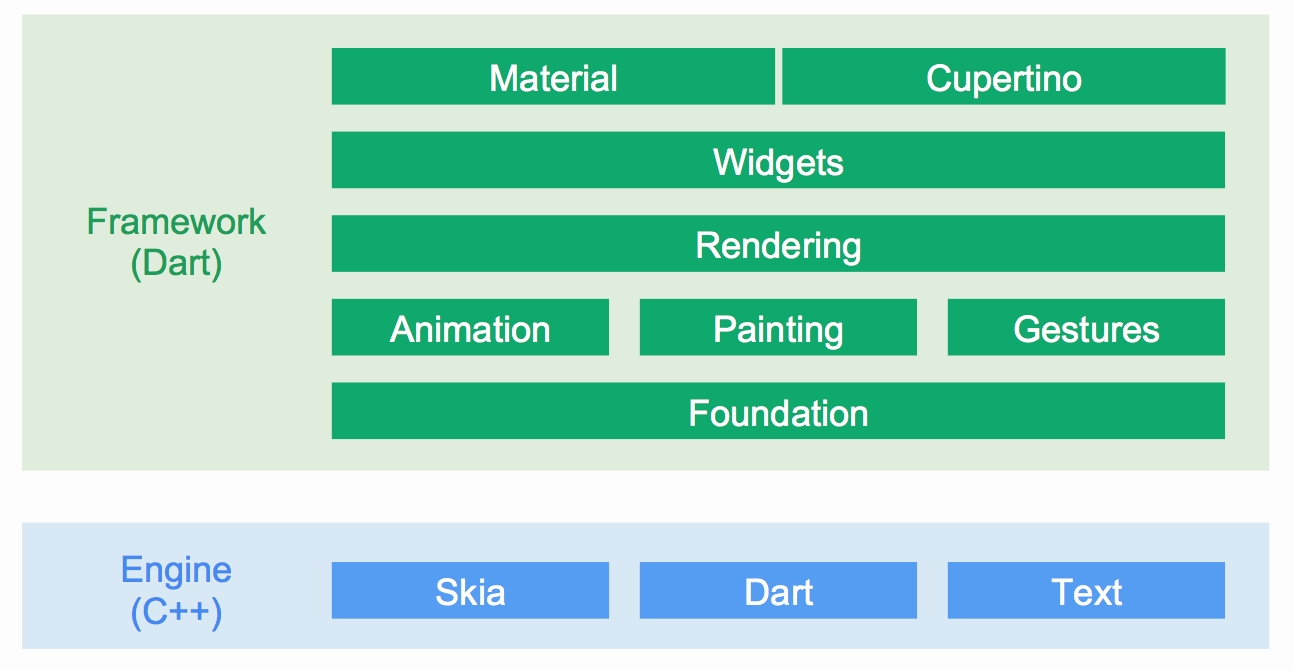
在深入代码之前,我们先了解一下 Flutter 框架结构:
底层的 Engine 库,负责语言的解释(Dart)、视图的渲染(Skia、Text).它们都是使用C、C++ 编写的,具有极高的性能。
Framework 中将编写 UI 所需要的动画、绘制、手势等独立实现,然后组合起来交由 rendering 层级来产生强大的效果,组件的层次是扁平化的,最大化可能的组合数量。
Flutter 自带了两套较为完善的 Widgets 套件,Android 平台风格的 Material 与 iOS 平台风格的 Cupertino
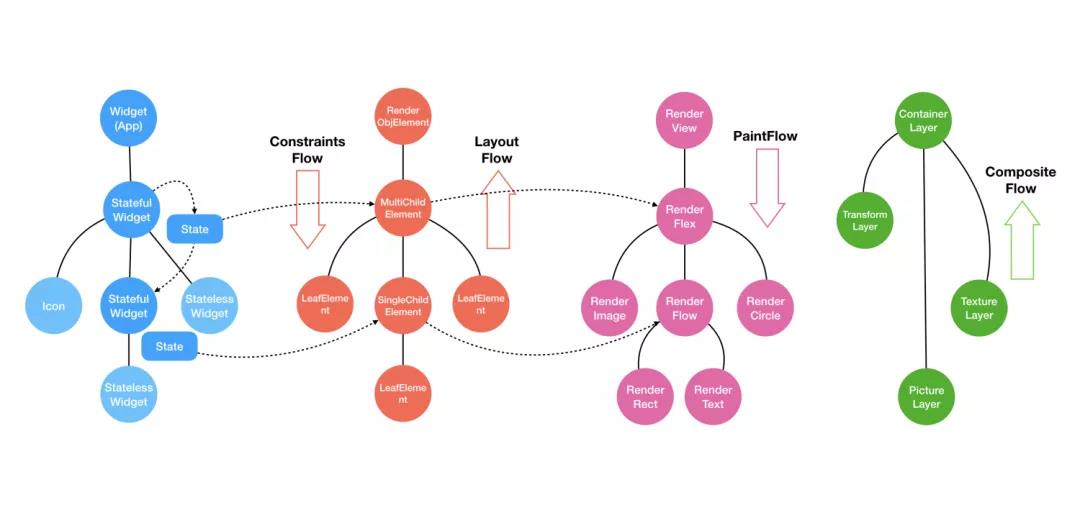
从结构图的我们可以看到 Android Flutter 结构非常扁平化,功能也都奉行单一职责,我们可以较为容易的了解我们所需要的代码实现。从层次上可以看出我们经常使用的 StatelessWidget、StateFullWidget 属于 Widget 层,它们并不负责具体的渲染工作,而是 redering 层来做,实际上也是这样的。widget 只是一个数据配置的类,它的创建/销毁都是十分轻量级的。它所做的就是通过 widget 树来创建和映射一个实际的视图渲染树 renderObject。我们可以通过官方文档的流程图来了解这一流程:
我们在项目中编写代码构建了一个 widget 树,通过 runApp() 装载或者 setState 的时候就触发了树的更新和渲染机制。
通过 widget 树生成了一个 Elment 树,它的职责是桥接、管理 Widget树 与 Render 树
在 Elment 中,生成对应的 render树,然后根据 Widget 的布局属性进行布局和绘制
当我们使用 setState({}) 触发更新的时候,同样会触发上述流程,只不过这时发生的更新是局部的,锁定需要更新的区域,进行对子树的删除或更新操作
Widget 为我们一般情况下直接用来构建界面的组件,通过它来描述当前的配置下视图应该呈现的样子,在创建 Widget 的时候都需要将所有的构造参数设定为 final ,即整个 Widget 是 immutable 状态。因为这样设计的话,就可以当数据变更的时候发送通知到对应的可变更节点,由上到下对 重建整个 Widget 树经行刷新,而不用关心具体会影响到哪些节点。 Widget 分为有状态的StatefullWidget 与无状态的 StateelessWidget 。它们的特性如下:
StatelessWidget: 无中间状态变化的 Widget,需要更新展示内容就得重新通过 new 。它的整体是一个 final 的。
StatefullWidget: StatefullWidget 可以在内部存储和发生状态变化,之前有提到,Widget 设计上必须为 immutable 状态的,所以 StatefullWidget 还有一个必须实现的抽象方法 createState() ,它需要你实现返回一个继承了 State 的类,通过它来存储中间状态和通知树更新。State 类拥有完整的视图生命周期,它提供了一系列的钩子函数,在对应的视图阶段会被触发,以便开发者做出响应:
ininState() state 创建后被插入到树中时候嗲用didUpdateWidget(newWidget) 当祖先节点被 rebuild widget 时调用deactivate() 被 remove 的时候调用didChagnedDependecies() 在 intState() 之后、或者依赖的 InheriteWidget rebuild 之后被调用build() 当初始化准备工作完成后或者 State 触发视图改变的时候都会被调用dispose() 当 widget 彻底被销毁的时候调用reassemble() hot reload 时调用
从图片了解 Widget 的装载和更新过程,从文档中了解了 widget 的生命周期。再我们通过从代码的角度来看看这一切到底是如何发生的。
我们通过新建 flutter project 所生成的计数器来演示:
1
2
3
4
5
6
7
8
9
10
11
12
13
14
15
16
17
18
19
20
21
22
23
24
25
26
27
28
29
30
31
32
33
34
35
36
37
38
39
40
41
42
43
44
45
46
47
48
49
50
51
52
53
54
55
56
57
58
59
60
61
62
63
64
import 'package:flutter/material.dart' ;void main() => runApp(MyApp());class MyApp extends StatelessWidget @override Widget build(BuildContext context) { return MaterialApp( title: 'Flutter Demo' , theme: ThemeData( primarySwatch: Colors.blue, ), home: MyHomePage(title: 'Flutter Demo Home Page' ), ); } } class MyHomePage extends StatefulWidget MyHomePage({Key key, this .title}) : super (key: key); final String title; @override _MyHomePageState createState() => _MyHomePageState(); } class _MyHomePageState extends State <MyHomePage > int _counter = 0 ; void _incrementCounter() { setState(() { _counter++; }); } @override Widget build(BuildContext context) { return Scaffold( appBar: AppBar( title: Text(widget.title), ), body: Center( child: Column( mainAxisAlignment: MainAxisAlignment.center, children: <Widget>[ Text( 'You have pushed the button this many times:' , ), Text( '$_counter ' , style: Theme.of(context).textTheme.display1, ), ], ), ), floatingActionButton: FloatingActionButton( onPressed: _incrementCounter, tooltip: 'Increment' , child: Icon(Icons.add), ), ); } }
初始化 当 app 启动候,engine 库装载成功 ,main.dart 中 main 函数被启动,runApp(widget) 函数被调用,属于 flutter 工作就开始了。 runApp(wiedget) 做的事情很清晰
1
2
3
4
5
void runApp(Widget app) { WidgetsFlutterBinding.ensureInitialized() ..scheduleAttachRootWidget(app) ..scheduleWarmUpFrame(); }
通过 WidgetsFlutterBinding 初始化所有 flutter 需要的组件
构建 widget 树所对应的 element 树和 render 树
开始做绘制的准备工作。
WidgetsFlutterBinding 内部实现代码虽然只有寥寥几行,但是它实际是通过 dart 的 mixins 特性,像架构图那样,将所有的功能聚合,具体实现则分开。当 widgetsFlutterBinding 实例化的时候,他所继承的所有类也都一一实例加载了。
1
2
3
4
5
6
7
8
9
10
class WidgetsFlutterBinding extends BindingBase with GestureBinding , ServicesBinding , SchedulerBinding , PaintingBinding , SemanticsBinding , RendererBinding , WidgetsBinding static WidgetsBinding ensureInitialized() { if (WidgetsBinding.instance == null ) WidgetsFlutterBinding(); return WidgetsBinding.instance; } }
接下来就是构建过程
1
2
3
4
5
6
7
8
9
10
11
12
13
14
15
void scheduleAttachRootWidget(Widget rootWidget) { Timer.run(() { attachRootWidget(rootWidget); }); } void attachRootWidget(Widget rootWidget) { _renderViewElement = RenderObjectToWidgetAdapter<RenderBox>( container: renderView, debugShortDescription: '[root]' , child: rootWidget, ).attachToRenderTree(buildOwner, renderViewElement); }
构建树 scheduleAttachRootWidget 实际的方法是 attachRootWidget , 在这里通过适配器的 attachToRenderTree 方法构建 widget 对应的 elment 树和 renderObject。这时的 renderViewElement 还为 null 并没有被创建。renderView 里也只携带的 window 和屏幕参数的相关初始化信息。
1
2
3
4
5
6
7
8
9
10
11
12
13
14
15
16
17
18
19
20
21
22
23
24
25
26
27
28
RenderObjectToWidgetElement<T> createElement() => RenderObjectToWidgetElement<T>(this ); RenderObjectToWidgetElement<T> attachToRenderTree(BuildOwner owner, [ RenderObjectToWidgetElement<T> element ]) { if (element == null ) { owner.lockState(() { element = createElement(); assert (element != null ); element.assignOwner(owner); }); owner.buildScope(element, () { element.mount(null , null ); }); SchedulerBinding.instance.ensureVisualUpdate(); } else { element._newWidget = this ; element.markNeedsBuild(); } return element; }
当应用初始化的时候 element 树毫无疑问是还没有的,这里就开始构建整个 element 树。整块区域的关于绘制构建的就是 buildScope。接下来我们也从这里进去一探究竟。
1 2 3 4 5 6 7 8 9 10 11 12 13 14 15 16 17 18 19 20 21 22 23 24 25 26 27 28 29 30 31 32 33 34 35 36 37 38 39 40 void buildScope(Element context, [ VoidCallback callback ]) { try { _scheduledFlushDirtyElements = true ; if (callback != null ) { _dirtyElementsNeedsResorting = false ; callback(); } _dirtyElements.sort(Element ._sort); _dirtyElementsNeedsResorting = false ; int dirtyCount = _dirtyElements.length; int index = 0 ; while (index < dirtyCount) { _dirtyElements[index].rebuild(); } index += 1 ; if (dirtyCount < _dirtyElements.length || _dirtyElementsNeedsResorting) { _dirtyElements.sort(Element ._sort); _dirtyElementsNeedsResorting = false ; dirtyCount = _dirtyElements.length; while (index > 0 && _dirtyElements[index - 1 ].dirty) { index -= 1 ; } } } } finally { for (Element element in _dirtyElements) { assert (element._inDirtyList); element._inDirtyList = false ; } _dirtyElements.clear(); _scheduledFlushDirtyElements = false ; _dirtyElementsNeedsResorting = null ; } }
从代码和注释可以看出来,buildScope 是将所有被 scheduleBuildFor 标记为脏元素的 element 在此重新执行 rebuild 方法。而 buildScope 中并没有看到 scheduleBuildFor 的方法调用,那么很显然 在 callback 里了。在 callback 中我们看到 element 的 mount 方法被执行。
1
2
3
4
5
6
7
8
9
10
11
12
13
14
15
16
17
18
19
20
21
@override void mount(Element parent, dynamic newSlot) { assert (parent == null ); super .mount(parent, newSlot); _rebuild(); } @override void mount(Element parent, dynamic newSlot) { super .mount(parent, newSlot); _renderObject = widget.createRenderObject(this ); assert (_slot == newSlot); attachRenderObject(newSlot); _dirty = false ; }
mount 在初始化的时候创建了我们真正负责渲染的类 renderObject . 然后开始了视图构建的过程。
1
2
3
4
5
6
7
8
9
10
11
12
13
14
15
16
17
18
19
20
21
22
23
24
25
26
27
28
29
30
31
32
33
34
35
static const Object _rootChildSlot = Object (); void _rebuild() { _child = updateChild(_child, widget.child, _rootChildSlot); } Element updateChild(Element child, Widget newWidget, dynamic newSlot) { if (newWidget == null ) { if (child != null ) deactivateChild(child); return null ; } if (child != null ) { if (child.widget == newWidget) { if (child.slot != newSlot) updateSlotForChild(child, newSlot); return child; } if (Widget.canUpdate(child.widget, newWidget)) { if (child.slot != newSlot) updateSlotForChild(child, newSlot); child.update(newWidget); assert (child.widget == newWidget); return child; } deactivateChild(child); assert (child._parent == null ); } return inflateWidget(newWidget, newSlot); }
当进入到 rebuild 方法后我们发现这里并不是只处理了初始化时视图构建的逻辑,前面的大部分很明显是为了更新和复用提供的,事实也没错,但是更新如何执行到这里还还是要稍后揭晓,我们继续看看 inflateWidget
1
2
3
4
5
6
7
8
9
10
11
12
13
14
15
16
17
18
19
20
21
22
23
24
25
26
27
28
29
30
31
32
33
34
35
36
37
38
39
40
41
42
43
44
45
46
47
48
49
50
51
52
53
54
55
Element inflateWidget(Widget newWidget, dynamic newSlot) { final Key key = newWidget.key; if (key is GlobalKey) { final Element newChild = _retakeInactiveElement(key, newWidget); if (newChild != null ) { newChild._activateWithParent(this , newSlot); final Element updatedChild = updateChild(newChild, newWidget, newSlot); assert (newChild == updatedChild); return updatedChild; } } final Element newChild = newWidget.createElement(); newChild.mount(this , newSlot); assert (newChild._debugLifecycleState == _ElementLifecycle.active); return newChild; } @override void mount(Element parent, dynamic newSlot) { super .mount(parent, newSlot); assert (_child == null ); assert (_active); _firstBuild(); assert (_child != null ); } void _firstBuild() { rebuild(); } @override void performRebuild() { Widget built; try { built = build(); debugWidgetBuilderValue(widget, built); } catch (e, stack) { built = ErrorWidget.builder(...); } finally { _dirty = false ; } try { _child = updateChild(_child, built, slot); assert (_child != null ); } catch (e, stack) { built = ErrorWidget.builder(...); } }
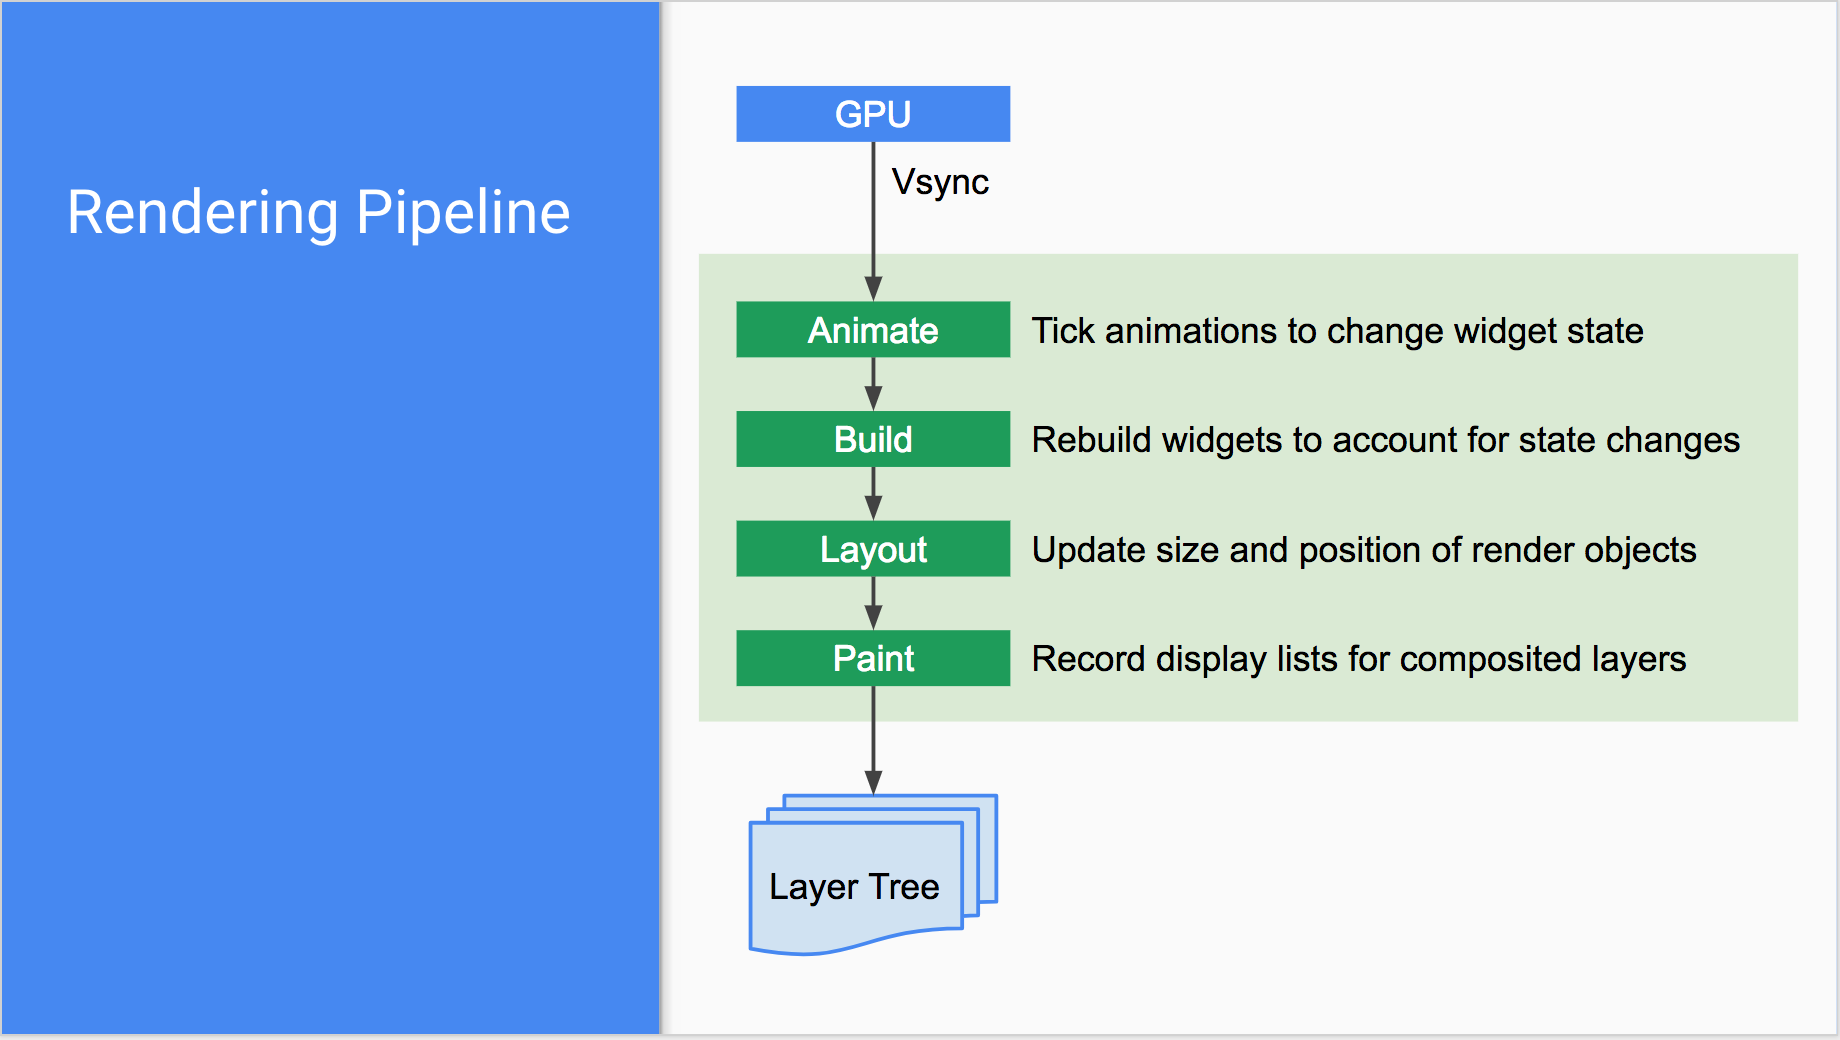
渲染视图 到这里整个 renderObject 的树就创建完成了,当 Engine 通过 callback 通知 rendering 层开始渲染时候,渲染工作也就开始了,下图为渲染过程:
本次我们主要关心 build 与 layout 部分,之前的 build 过程已经分析完了,接下来就是 layout ,paint。这里就不做详细分析了,我们可以看到 drawFrame 被调用后它们也都分别完成了各自的工作,然后将数量打包交给引擎最后渲染到窗口。
1 2 3 4 5 6 7 8 9 10 11 12 13 14 15 16 17 18 19 20 21 22 23 24 25 26 27 28 29 30 31 32 33 34 35 36 37 38 39 40 41 42 void _handlePersistentFrameCallback(Duration timeStamp) { drawFrame(); } @protected void drawFrame() { assert (renderView != null ); pipelineOwner.flushLayout(); pipelineOwner.flushCompositingBits(); pipelineOwner.flushPaint(); renderView.compositeFrame(); pipelineOwner.flushSemantics(); } void flushLayout() { try { while (_nodesNeedingLayout.isNotEmpty) { final List <RenderObject> dirtyNodes = _nodesNeedingLayout; _nodesNeedingLayout = <RenderObject>[]; for (RenderObject node in dirtyNodes..sort((RenderObject a, RenderObject b) => a.depth - b.depth)) { if (node._needsLayout && node.owner == this ) node._layoutWithoutResize(); } } } finally { .... } } void _layoutWithoutResize() { performLayout(); markNeedsSemanticsUpdate(); markNeedsPaint(); }
以上就是 Flutter 初次运行时候的构建过程。我们可以发现其中混杂了许多判断更新的代码,由此也可以判断,flutter 的视图创建和更新有不小的重合,事实也确实如此,接下里我们看看 Flutter 中视图是如何更新的。
更新 通常我们都是调用 setState({}) 通知更新,在计数器程序里,我们监听了 FloatingActionButton 的点击事件,在事件中使用 setState({counter++;}) 来使得 Text 组件使用的数据发生了变换。:
1
2
3
4
5
6
7
8
9
10
11
12
13
14
15
16
17
18
19
20
21
22
23
24
25
26
27
28
29
30
31
32
33
34
35
36
37
void _incrementCounter() { setState(() { _counter++; }); } @protected void setState(VoidCallback fn) { assert (fn != null ); final dynamic result = fn() as dynamic ; assert (() { if (result is Future) { throw FlutterError.fromParts(....); } return true ; }()); _element.markNeedsBuild(); } void markNeedsBuild() { if (!_active) return ; if (dirty) return ; _dirty = true ; owner.scheduleBuildFor(this ); } void scheduleBuildFor(Element element) { _dirtyElements.add(element); element._inDirtyList = true ; }
当我们将 element 标记为后 WidgetsBinding 的 drawFrame 方法同样被调用. drawFrame 与 reanderBinding 的方法有些许类似,但是它在 drawFrame 操作之前还调用了我们之前看到的 buildScope 来重新构建当前区域的树,只有再通过 _rebuild udpateChild 一系列的方法对比和移动 widget 。最后在重新 drawFrame 将改变的视图更新的窗口上。
1
2
3
4
5
6
7
8
9
10
11
12
13
14
15
16
17
18
19
20
21
22
23
24
25
26
27
28
29
@override void drawFrame() { if (_needToReportFirstFrame && _reportFirstFrame) { assert (!_firstFrameCompleter.isCompleted); TimingsCallback firstFrameCallback; firstFrameCallback = (List <FrameTiming> timings) { if (!kReleaseMode) { developer.Timeline.instantSync('Rasterized first useful frame' ); developer.postEvent('Flutter.FirstFrame' , <String , dynamic >{}); } SchedulerBinding.instance.removeTimingsCallback(firstFrameCallback); _firstFrameCompleter.complete(); }; SchedulerBinding.instance.addTimingsCallback(firstFrameCallback); } try { if (renderViewElement != null ) buildOwner.buildScope(renderViewElement); super .drawFrame(); buildOwner.finalizeTree(); } finally { ... } _needToReportFirstFrame = false ; }
可以发现相比 Android 系统的视图应用初始化过程,Flutter 作为一个跨平台 UI 视图框架确实更加简洁。需要关注和操心的事情更小。而 immutable 的 widget 设计,也使得在更新的时候也十分的简单,widget 重用与实际渲染对象分开映射,让 widget 的重建并不特别的花费成本。
参考 深入了解 Flutter 界面开发


